How to Rename Your Photos in a Single Step ?
Digital Photos fresh out of a digital camera, mobile phone or a scanner will inevitable come with rather cryptic filenames which is not easily apparent as to what the photos are about. We would invariably have to spend hours to rename them, at least that’s how it was done in the past. One of the core features of our batch image processors is the ability to batch rename the photos to something which is more apparent to you.
In this little tutorial, we will explore two commonly used methods of file renaming which can be done with any of our batch image processors. They are to tag a Prefix and/or a Suffix to an existing filename and to rename the filenames using a running number.
Tagging Prefix and Suffix to the existing Filename
Sometimes, you might already have perfectly curated filenames and during a resizing, you might want to tag a “_s” behind the filename for the smaller resized image.
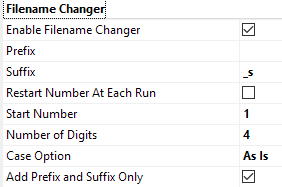
This is relatively easy as all you need to do is to ensure that the “Add Prefix and Suffix Only” checkbox is checked. Doing this will disable the auto-numbering feature of the application and just tag any Prefix and Suffix which is listed in the respective boxes.
Now that we tackled something simple, let’s look at the second way to use Filename Changer.
[wp_ad_camp_2]
Setting the Auto-numbering Filenames
This method is useful in renaming files just fresh off the digital camera. Say if you just visited the Zoo and transferred the photos to your computer and want to be able to rename them so that they shows up as Zoo_0001_Large.jpg, Zoo_0002_Large.jpg and so on.
To do this, use the following settings

What we do is here is firstly to disable the “Add Prefix and Suffix Only” option and by doing so, the Auto-numbering feature will be enabled.
The next step would be to furnish it with the prefix and/or suffix which would be the constant part of the filename. In our case, the Prefix is set to “Zoo_” so all filenames will begin with that and the Suffix set to “_Large”. Of course, you can leave the prefix blank, you will have the running number as the filename. It is important to ensure that only permitted alphanumeric characters are used and not symbols or wildcard characters such as ” or *.
[wp_ad_camp_3]
The running number options is controlled by the Start Number and the Number of Digits options. The Start Number will be the first number of the first file on the list and the number of digits will determine how much zero padding to the filename will be added. Zero padding is useful to make it easy to read the numbers and will ensure that in a simple Windows Explorer sort, the filenames will be sorted properly. On the side note, Windows Explorer doesn’t distinguish a number from an alphabet in terms of a sort so if you have numbers like 1,2, 10 and you do an ascending sort, you get 1,10,2. When you zero pad the files to 4 digits, it will be renamed to 0001,0002 and 0010 which will make any sort feasible and keep the number of characters of each filename to be the same which increases readability.
The option “Restart Number At Each Run” when checked will keep the Start Number as you have entered. When this option is unchecked, it will be updated with the next number after a batch processing run. So if you have 10 images and the initial Start Number is set to 1, after the run, it will be updated to 11 for the subsequent run and so on.
[wp_ad_camp_1]
Notes
JBatch It, Batch It, Batch It Pro and Batch It Ultra are predominately batch image processors and by default the filename changing process will work in conjunction with the batch image processing function. However if you do just want to rename all your photos without going through the image processing, just check the “Do Filename Change Only” checkbox in the Control Center.
We hope that you find this tutorial useful. In future tutorials we will explore other methods of using the Filename Changer and get into some more complex methods.