How to Resize Your Photos for your Website
One of the most common task performed by our Batch Imaging Application is the process of Downsizing Photos. Today’s digital camera can take pictures of tens of mega pixels which is great for viewing on the local computer and for printing as it contains a lot of minute details. However, these pictures are huge especially if you want them to be placed on your website or even to send over email.
In this tutorial, we will explore the Downsize by Pixels resizing method which will resize a picture down to a much smaller dimension. A pixel represents a single dot on the screen and the size of the pixel can vary from display to display. Modern phones and high definition displays can packed in more dots per inch than ever before. However, we use Pixels as that is the parameters uses in digital photography.
In our applications, instead of just doing a downsizing of a photo to the defined Width and Height, it has the function to ensure that the photos when resized keep to their ratio aspect. In layman’s term, it basically will ensure that your photos doesn’t get stretched or squashed. There is a formula behind ratio aspect which is Height divided by Width multiplied by the new Width to get the new Height. It does get a little more complex than that when other parameters comes into play. I shall not bore you with the technical details. All you need to do is to check a single checkbox.
Below is the example of a resized photo when the Keep Dimension Ratio Aspect is unchecked.
In the above example, we had the Ratio Aspect unchecked with a Width and Height set to 300 and what happens here is that the photos is squashed to fit that dimension.
[wp_ad_camp_3]
Now we shall look at the same settings but this time when the Keep Dimension Ratio Aspect checked.
This time around, our software was intelligent enough to ensure that the Width doesn’t exceed the set dimensions and the Height is adjusted to keep to the ratio aspect. Both before and after photos looks the same except that the later is smaller.
[wp_ad_camp_1]
Then now the question is that if what if there is a need to keep the photo dimensions exactly as 300 by 300 pixels and still keep to the ratio aspect. This is especially true when the photos need to go on a thumbnail gallery or on eBay when there is a need to keep everything standardized. Imagine if you have a thumbnail gallery with pictures of different dimensions then it can look quite messy. The solution here is the By Frame resizing method.
The By Frame Resizing Method applies the best of both worlds, firstly by resizing the photos with the aspect ratio enabled and then padded the sides that is smaller with a user determined background color.

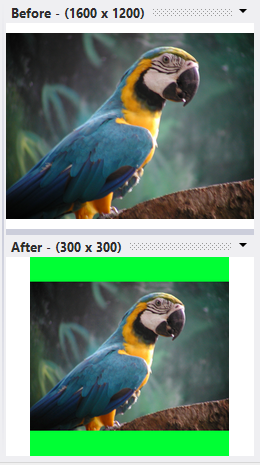
The settings is almost the same as the Downsize by Pixels, the only change is setting the Resizing Method to By Frame and setting the Frame Color. The frame color is the background color. In our case, we set it to a dramatic bright green so that you can see the effect. You might want to set it to the background color of the website or page that you want to include this in.
With the By Frame resizing method, you can see that there is no need to check the Keep Dimension Ratio Aspect checkbox as it is implied.
[wp_ad_camp_2]
Before we end off this tutorial, here is a few titbits for you.
You can set the Width or Height as 0 and the original dimension would be substituted in dynamically.
Also if you are wondering what Swap Dimensions if Portrait Image settings is. Traditionally the camera is made to take landscape photos where the picture is horizontal with the width being the longest dimension compared to the height. However, there are times when we take portrait photos which requires a traditional camera to be turn but is now the normal method of holding a smart phone. A portrait photo is where the width is now shorter than the height. When you have the option checked, the application will ensure that longest dimension is treated as Width no matter the orientation of the photo.
You can manually apply the resizing methods to your photos but with our applications particularly Batch It Ultra, Batch It Pro, Batch It, JBatch It and iRedSoft Image Resizer can do this with ease and save you the burden of calculating the ratio aspect and apply the resizing to every single photos. It can get complex if there is a need to perform the By Frame resizing method by hand.